Before we get started I wanted people to know when you Electrify water with high intense electricity that it will kill any bacteria in the water, the carbon is supposed to take out other types of matter.

You can make this water filter or you can buy it, the difference between the two if you make your own is that you're going to put a small iron cage inside the plastic that screws in from the bottom then using a nine volt or any other electrical supply you're going to apply electricity to that cage with a carbon filter to use any other particles not wanted in your water, or buy this already made which uses
ÖKO combines water filtration technology originally designed for use in NASA ISS (International Space Station) with an elegant bottle design made of 100% FDA compliant materials. The combination yields a unique filtration bottle which is lightweight, versatile and can deliver the highest quality water from innumerable water sources in over 140 countries.
With a filter capacity of 378 Liter, the ÖKO level-2 filter (included with every bottle), has been lab tested to remove 99.9999% of giardia lamblia & cryptosporidium, two of the most common contaminants found in open water sources worldwide.
ÖKO bottles may also be used with other filtration levels (sold separately).
For a listing of the appropriate filter please refer to the ÖKO ON THE GO Chart
BOTTLES:
ÖKO’s patented water bottles are made from a customized blend of plastics that have passed stringent SGS testing for FDA food contact safety. The bottle cap is made of Tritan®, a BPA-free clear hard plastic renowned for its durability and clarity. It also allows the user to see water filtration in action. The bottle’s body is made of an ultra-light polypropylene material commonly used in food storage containers. Due to the material’s high temperature resistance, it does not leach chemicals or smell when exposed to warmer temperatures.
Our semi-soft nozzle and washer create functional accents and the contoured shape makes the bottle easy to grip. The Ö-ring carabiner is used to carry or hook the bottle onto a bag.

ÖKO FILTERS & HOW THEY WORK:
All Bottles come Equipped With our ÖKO Level-2 advanced Filter.
ÖKO Level-1 filter is carbon based and it is designed to effectively reduce present chlorine, taste and odor while providing crisp and clean tap water.
This filter emits the fastest water flow with effective filtration.
This filter is sold separately.

ÖKO Level-2 filtration, was originally developed for NASA and used in the ISS (International Space Station). We convert the material for consumer use in our bottles. Simply put, it is the state of-the-art in water filtration technology.
In addition to a 2 micron pore size, the material utilizes a positively charged electro-adsorption (attraction and retention) process to draw and trap harmful agents much smaller than its
pore size. Charge fields, activated upon water contact extend 1 micron each to virtually close the pore to any intruding agents. ÖKO level-2 filter lab tests reflect removal of 99.994% of e-coli, 99.9999% of cryptosporidium and giardia lamblia, the most commonly found bacteria and microorganisms in lakes, streams and international water sources. A stack of over 400 such pores in the 0.8mm thickness of the filter create a “tortuous path” which a harmful agent would have to travel through in order to make it across the filter membrane. For detailed chart of the OKO Level-2 filter performance click here.
pore size. Charge fields, activated upon water contact extend 1 micron each to virtually close the pore to any intruding agents. ÖKO level-2 filter lab tests reflect removal of 99.994% of e-coli, 99.9999% of cryptosporidium and giardia lamblia, the most commonly found bacteria and microorganisms in lakes, streams and international water sources. A stack of over 400 such pores in the 0.8mm thickness of the filter create a “tortuous path” which a harmful agent would have to travel through in order to make it across the filter membrane. For detailed chart of the OKO Level-2 filter performance click here.
So let's learn how to make your own charcoal

Yes, you can make it at home, but it’s a little more complicated than you might think.
A little more complicated is an understatement. If you can buy activated charcoal and stock it, go for it. Making it is a complex and tedious chore. Some websites say it’s so easy. Well, it’s not. I’m not saying it can’t be done, but you have to be patient and respect and understand the process. You probably already know the benefits related to water purification, poison treatment, and other things. The question is, what do you do if everything goes down and you run out of activated charcoal? Here’s how to roll up your sleeves and make this magic powder.
You need some basic ingredients. Some are easy to find and improvise, others are a bit obscure and somewhat scary. The good news is that there are alternatives to make this process work, and we’ll cover those ingredients and those steps.
Activated Charcoal Ingredients
- Charcoal or the hard woods that will allow you to make it.
- Calcium Chloride, Zinc Chloride or Lemon Juice.
- Water.
Tools for Making Activated Charcoal
- A hot fire.
- A durable pot with a loose-fitting lid to make the charcoal if you don’t buy your own.
- A hammer or small sledge to crush the charcoal for the first time, plus some plastic bags to contain the charcoal lumps.
- A mortar and pestle, blender, or food processor to reduce the charcoal to dust.
- Fine mesh screen or strainer to separate smaller particulates from larger.
- Pans to capture and allow the charcoal dust to soak in the chemical actifier and then rinse.
- Distilled water for rinsing away the actifier.
- Coffee filters for the final filter.
- Time and patience.
Directions:
We’re not going to cheat so we’ll make this from scratch. There are cheats and we’ll highlight them along the way. You may know a few and please pitch in with any thoughts or suggestions.
Step 1: A Source of Charcoal
You don’t want to buy regular charcoal briquettes to make activated charcoal. Commercially produced charcoal briquettes often have various chemicals added during the manufacturing process.
However, there are brands of charcoal that are commonly referred to as “lump charcoal” with the added promise of “100% natural and chemical free.” Read the label and if you believe it’s true, you can use that as your charcoal source. Otherwise, you’ll have to make your charcoal from scratch.
Step 2: Charcoal Making 101

Charcoal is made when wood is subjected to high heat but denied the oxygen that would cause it to burst into flame. The high heat causes the wood to release various organic materials, smoke and gases and a good amount of cellulose leaving relatively pure carbon.
The simplest way to do this is to put lumps of wood into a large pot with a loose-fitting lid and literally cook your wood over a very hot fire.

The best woods to use are hardwoods like oak or maple. Avoid highly resinous woods like pine, tamarack, cedar, birch or spruce. You should also remove the bark and cut and split the pieces into 3 to 4-inch chunks or smaller.
Pile the wood pieces into the pot, cover and get your fire going underneath. The pot can be suspended over the fire on a tripod or placed onto a grate or the grill on a kettle grill. The temperatures needed to make charcoal are in excess of 600 degrees Fahrenheit up to 800 degrees, so you want a fire with flames licking at the bottom of your pot of wood chunks. The loose-fitting lid will allow the smoke to escape but prevent the wood from catching fire.
Be very careful if you’re tempted to lift the lid during this process. Hot smoke and gases from the pot are highly flammable and you may find your pot of wood chunks bursting into flames if you lift the lid. Typically, it takes 3 to 6 hours to convert a pot of wood chunks to charcoal. Wait until the fire has burned down and remove the lid quickly and carefully to assess your progress. You may have to stir the charcoal chunks around to measure your success and even break up some pieces to make sure they have carbonized through and through.
If not, rekindle the fire and give your pot of wood chunks some more time. When done, rinse the charcoal in water and allow to drain and completely dry on a wire rack or dry surface.
Step 3: Pulverizing Your Charcoal
Your goal is to reduce your charcoal chunks to a fairly, fine powder. You start by breaking the lumps into smaller pea-sized pieces. Placing your charcoal chunks into two plastic bags and gently crushing them with the side of a hammer is a good way to start.
Once you have your charcoal reduced in size, you can use a mortar and pestle to continue to pulverize the charcoal, or you can use a food processor or blender if you’re in a hurry. Charcoal dust will clean up well from your food processor or blender if you use sufficient water, but you might want to do any pulverization outside.
In fact, you should try to do as much of this process outside as you can. As the charcoal turns to powdered carbon, it will drift into the air and coat many things around you. That can be a very invasive mess in the kitchen
Step 4: Screening Your Charcoal
Regardless of the method you use to pulverize your charcoal, you’re still going to have some bigger pieces mixed in with your finer sizes. A fine-mesh screen or strainer over a pan is the easiest way to capture your nicely pulverized charcoal and separate it from the bigger pieces.
You don’t want to do this on a windy day or you may lose a lot of your charcoal to the wind. Try to find a sheltered area outdoors if you must.
Step 5: Activating The Charcoal
Charcoal is activated using a chemical. The chemical of choice is calcium chloride (CaCl2) added to water, although zinc chloride (ZnCl2) can also be used and there’s a natural source called “lemon juice.” The acetic acid in the lemon juice will activate the charcoal in the same way as calcium chloride or zinc chloride.
If you’re shy about chemical names ending chloride, the lemon juice may be the way to go, but remember that even something as common as table salt is sodium chloride.
Calcium chloride can be purchased at some hardware stores, pharmacies, brewer’s supply stores, or on the Internet. The same for Zinc chloride.
While they’re both a benign chemical when rinsed from the charcoal after the activation process, they can become extremely warm when added to water up to 130 degrees Fahrenheit. The dilution is a 25 percent concentrated solution in a mason jar with a lid and then gently shaken.
To make the solution, dissolve 250 g of calcium chloride or zinc chloride in 1000 ml of water. You could also think of it as one ounce of calcium chloride to 4 ounces of water. This should be enough to activate up to 8 ounces or a half pound of pulverized charcoal.
Remember to wear gloves when handling the jar if using calcium chloride or zinc chloride because the solution will get hot. If you’re using lemon juice, 1/2-cup of pulp-free lemon juice will suffice. Mix the solution with your charcoal until you have a paste-like slurry and cover.
The liquid calcium chloride solution, zinc chloride solution, or the lemon juice is allowed to soak in the charcoal for 24 hours in the covered pan. The solution should be at least a slurry with some liquid above the surface.
When done, the actifying solution needs to be rinsed away with water.
Step 6: Rinsing Away The Actifier
The easiest setup for rinsing your charcoal is a coffee filter in a mesh strainer suspended high over a bowl. This will take some time and the charcoal should be rinsed 3 times using distilled water.
Distilled water is pure H20. You don’t want to use well water because the calcium, iron, and lime in the well water will be captured by the charcoal and reduce its efficiency. City water often has fluoride and the same will happen as the charcoal captures the fluoride.
This is a time-consuming process and the added investment in a gallon or two of distilled water is well worth it.
Step 7. The Final Drying Step
You can allow your activated charcoal to air-dry or dry it in an oven at a relatively low temperature of 225 degrees Fahrenheit for 2 to 4 hours. Check it from time to time to see when it’s thoroughly dry
The best way to store activated charcoal is in a canning jar with a tight-fitting lid. You don’t want to allow activated charcoal to be exposed to air or chemicals in the air because odors or even humidity will degrade the charcoal as it absorbs whatever it is exposed to.
Another possibility is to encapsulate the activated charcoal in gel caps and store them in a jar. Activated charcoal is used to filter air, water, and as an antidote for poisons and exposure to heavy metals when ingested. The gel caps are the recommended way to take activated charcoal in the event of poisoning.
You’re Done!
You can scale up this recipe or scale it down. It all depends on how much you intend to use. It should store indefinitely if kept dry and well packaged.
 We saved the most obvious and probably the most reliable treatment method for last. Chlorine can work in the community water supply to kill microbes before it enters people’s jerry cans or home water supplies. And it keeps the water safe from new contaminations long after it is added.
We saved the most obvious and probably the most reliable treatment method for last. Chlorine can work in the community water supply to kill microbes before it enters people’s jerry cans or home water supplies. And it keeps the water safe from new contaminations long after it is added.
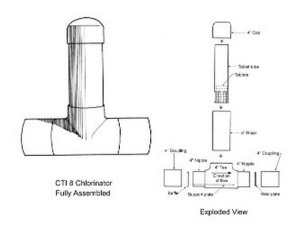
We’ve seen several interesting chlorination methods at work in resource-poor regions. Compatible Technology International developed this tested and proven device that chlorinates water in gravity-fed systems that fill a community water cistern. And these four experimental designs have worked in field tests to dose water accurately after people fill their buckets at a community well, stream or other source. The chlorinator, shown here fully assembled and broken down, attaches to a loop in the water pipe that feeds into the community tank. Image courtesy of CTI.


No comments:
Post a Comment